Friday, 12 July 2013

Succulent Love

Ever since I saw this picture on Pinterest i have wanted to do something similar and put it in the kitchen or living room.

So I have been keeping an eye out for a suitable glass container to star my succulent collection, checking my favourite place for glassware TK Maxx quite regularly

Well it just so happens I was in Ikea (shock horror!!) and I spotted this little beauty for the princely sum of £6- and it has been sat on the kitchen sideboard for nearly 2 months...


 It's a bit shallower then I would have liked but nevertheless it does the required job.

Next was a trip to the garden centre to pick up 3 succulent plants (absolutely no idea what the actual name is for them- on Pinterest they are called succulents!) and some decorative stones. The plants cost £1.99 each and the stones were £1.99 also! We already had some mud in a bag in the shed (not sure of actual gardening term) because that's just what homeowners do- they own random gardening products. 


Then quite simply I took the plants out of the plastic pots, arranged them in the glass bowl and filled around them with the mud. I probably shouldn't have done it on the dining room table - but i did clean it afterwards!


Then i just topped the mud with the stones to make it look more pretty! Only problem being that when i put the mud into the bowl I got quite a lot on the plants which made them look messy :( Alas i worked out that when you water the plants with a watering can the mud washed off them and they are pretty again! 

So now we have a nice new plant feature in our living room, for a total cost of about £14.


I think it could make quite a nice gift idea- relatively in expensive and you could tie a nice bow around i :)

Wednesday, 10 July 2013

Making a Draught Excluder

A few months back i was visiting my friend who has just bought her first house and admiring the place when i noticed she was using a scarf to block the draught from the cellar door and so i kindly offered to make her a draught excluder! Having never made anything of the kind it was bit of a trial and error approach, which thankfully didn't end up with too much error!


Items needed- fabric, fabric marker, scissors, tape measure, wadding, and sewing machine or needle and thread.

I measured the width of the door and added 2 inches to the length to allow for seams. The fabric width was about 20cm -I took the fabric and folded it over inside out to start sewing


secure the edge to be sewn with pins
I just used a simple stitch on the machine and sewed two of the 3 sides, then turned the fabric the right way out

The i filled the whole thing with cushion wadding. I did read a tutorial online which said fill with rice. Whilst I'm sure that would have been better in terms of weight- i don't think i could afford enough rice to fill the whole thing and it would be too heavy to carry!

Finally i just sewed up the end and it was finished! Whole thing took 1 hour maximum


Thursday, 4 July 2013

Wedding Gifts

So the last post was all about the interior inspiration we picked up on our recent honeymoon in Thailand. Of course before the honeymoon came the wedding!

Our guests were more than generous with their gifts, we have decided to save all of the gift vouchers we received for the house- to put towards furniture and accessorise when we finally get round to the renovation of downstairs next year. 

But one gift in particular is making a big impact on our house. You may remember this painting in our bathroom, it was painted by our friend Jason who sadly couldn't make the wedding because of a relocation to Cornwall falling in the same weekend!

Anyhow he more than made up for it when this arrived by courier the day we got back from our honeymoon...

After about 20 minutes i managed to get it out of all the protective cardboard and bubble wrap and reveal the amazing picture he has painted for us! We then spent the next hour carrying it round the house trying to decide where it should go.

First option was the hallway...


After considering it- although the picture really works well with the existing colour scheme, we already have a lot going on in this space, with the wallpaper, the radiator cabinet and the big mirror just opposite.

So we tried various places in the kitchen...


To be honest our scabby old kitchen didn't do it any justice whatsoever. And we didn't think it went here in the dining room either..

Finally we decided on a spot on the upstairs landing. It looks fabulous here, really tying in the colours of the dark dresser and blinds with the green of the plant. It also complements the white frames running up the stairs on the other side of the bedroom doorway.


So after a trip to B&Q to get the relevant heavy duty picture hanging kit and lots of nagging of my husband we have finally hung the picture :)


Absolutely love the picture there, i really think any artwork adds instance interest to a previously boring corner!

Saturday, 29 June 2013

Inspiration from Thailand

Its been such a long time since the last post! A lot has happened since then; like we got married (!) and have been away in Thailand for over 2 weeks since.

Today marks the 1 year anniversary of finally getting the keys to this little house! Looking back we were definitely slightly naive as to the scale of work needed to bring this house up to scratch, but we have done a lot in those 12 months- and there is still so much more left to do. 

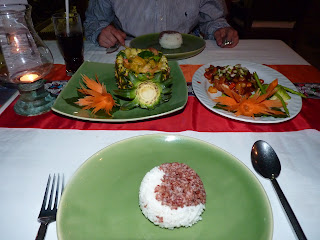
In Thailand I got some real inspiration in terms of interior design, from our hotel and some restaurants we visited. Even the local markets where i picked up quite a few bits and pieces for the house - more on that later.

We stayed at the Anantara Lawana Resort and Spa in Chaweng Koh Samui for the first part of our honeymoon. We had a pool villa, which consisted of terrace area, garden, small pool, bedroom and outdoor bathroom. I really loved the style of the room, neutral floor tiles and walls, with dark furniture and green/turquoise accents.

I want some chairs similar to these in the dining room

I love the dark wood with the neutral backdrop

Some details we will definitely re-create in the living room will be the use of the dark wood furniture and green accents. With light coloured walls, sofas and soft furnishings it shouldn't be too dark.
Wall Lantern in the bathroom, i like the idea of lanterns by the fireplace


The dark wood table in the bathroom for the towels. I want something similar to this (smaller) as end tables.

The other thing i like about the room was the use of light coloured curtains on dark wood poles- and the fabric was nice too! 


Green accents were the tray in the bathroom with all the amenities on, the cups for the complimentary tea and coffee, and in the restaurant they had elephant salt and pepper shakers in an amazing hue of ocean Green, i searched all the markets for something similar but couldn't find anything :( I probably could have just taken the ones from the hotel but technically that is theft which is illegal, and i really didn't fancy my chances in a Thai jail ;)
Loved these leaf plates at a local restaurant!


Lanterns, lanterns lanterns!

I also wanted to take this turquoise tray!


Well given all that I didn't actually buy any dark wood furniture, green accessorise or lanterns! But of course i picked up just a few bits and pieces for the house...


From left to right:
a) A new patterned scarf. Not actually to use as a scarf- i am going to make something out of it with my sewing machine, perhaps a top. - Cost equivalent of £3
b) An ancient style map of "Siam" or Thailand. It was actually a greetings card but i (of course) put it into a white frame when i got home ;)- Cost equivalent to £1.20
c) Mandatory fridge magnet of Thailand!
d) The little gold symbol in the plastic bag is the number 8 in Thai (or so i have been told!) Not sure what I am going to do with it yet, maybe attach some magnets to the back...
e) At the back is a Giraffe lamp. Shamelessly i stole this idea off our friends who have the same lamp. Ever since i first saw it at their house i have been banging on about how much i like it, so when i saw them for sale in Thailand i had to have one! Well imitation is flattery! It cost the equivalent of £6, and its main body is made form a coconut. Not sure where it's going to go yet and we need an adaptor for the plug.
d)A bronze Buddha head statue- i did some hard bargaining for this at a market in Bangkok called MBK. The lady originally wanted about £26 for it but in the end i got it for £8. She didn't seem very happy to give it to me at that but she was saying something about the first customer being lucky!
e) And finally a teak wood hand of Buddha- in the "peace" gesture. Cost approx £6

So many things to find homes for- would be easier if the living room was already finished because a few of those things can definitely go on the built in storage/TV stand we are planning. We also saw some amazing painters/paintings but we couldn't really bring any of them home safely. If we ever return then we will definetly come back with one or have one shipped.


Sunday, 5 May 2013

DIY Carpet Pattern Tutorial

Since my last post we have had a new addition to our family! Nope Max hasn't let me adopt another cat from the rescue home (yet!) but I finally got a sewing machine!!

Ever impatient- as soon as i got it last week for my birthday i whipped it out of the box and set it up on the desk in the office/guest room. Luckily Max was on hand t thread the thing because quite frankly the instructions baffled me (and men have to be good for something right??). So that was it- ready to go. I already have some pieces of fabric so I got one out and searched the Internet for cushion cover tutorials.

I figured something which required stitching in straight lines was going to be easiest to start on. I found this video and set about making an envelope cushion cover (no fastenings is much easier for a beginner!) from said fabric and an old cushion from the sofa...


I didn't really measure it out properly so its slightly bigger than the cushion itself and the envelope back isn't really an envelope but all in all it looks OK. Don't get me wrong when we have re-done the living room this wont really go with the decor but it was a good beginners project.

So with some false confidence i went ahead and bought some star patterned fabric and a "1 hour Easy" sewing pattern for a top from John Lewis. 

r
Really i should have complained to trading standards for mis-leading product information- there was nothing "easy" about trying to work out this pattern!! Anyway getting back to the house- after a few days of cutting out all the pieces i had to iron in something called interfacing which is something which gives clothes structure. At this point it was late at night i was tired and i thought i could quickly just iron it on- on the carpet. Boy was i wrong!!!! After pressing the iron down about 5 times i only then realised that i was melting the carpet and my top was actually fused to the carpet :( :(

Stupid stupid stupid girl. Once Max had managed to peel the fabric off the carpet the extent of the damage was clear


So you can see i have came up with an amazing DIY way to brighten up boring beige carpet! Although this carpet isn't new, as in it was already here when we moved in, we did intend to keep it as its not that offensive. The plan now is to get a rug to go under the desk and cover the burn until we get a whole new carpet... But you know the top actually turned out alright in the end!

In other house news- we have cleared out 3 of the shelves on our Expedit book case in the office/guest room to make room for my craft supplies. When we re-do the living room we will be doing quite a big built in book case/TV stand so we have put some of the books we have already read into storage until they can go to their new home downstairs..

I bought the storage boxes on the top left hand side shelf from TK Maxx not long ago and they hold all my fabrics and threads. I've used the basket which used to be in the airing cupboard to hold all my wool which used to be in a drawer (so i kept buying more and more because i couldn't see them!). Not so long ago my Nana gave me a big box of vintage buttons which i have dispensed into this old biscuit jar and covered the lid in a scrap of fabric we had left over from the blinds

Cant quite believe that the books just off those 3 small shelves was enough to fill this big box!

Other additions to the room include this wire cake stand which i imagined i would use to store something crafty but i haven't yet decided on what yet, and a new plant for the windowsill - I do love plants!


Next project is the garden!!